The optimal YouTube banner image size is 2560 x 1440 pixels. However, you should keep your important text and images within a safe space of 1546 x 423 pixels at the center of the image, because YouTube crops the banner image based on the device where it is displayed.
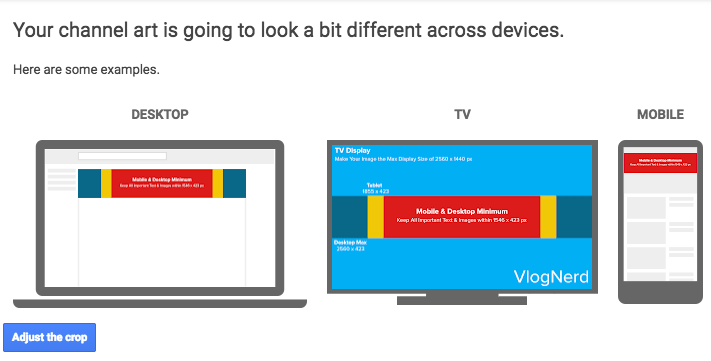
Once you upload your banner, YouTube shows you how it will be cropped on various devices.
In This Post:
- YouTube Banner Template
- How to Upload a YouTube Banner
- How to Add Links & Social Media Profiles to your YouTube Banner
- YouTube Banner Tips & Examples
- The Best Tools for Creating a YouTube Banner
YouTube Banner Template
To create a YouTube banner image (also called YouTube Channel Art), you should start by creating an image that's 2560 x 1440 pixels. The "safe space" within this for important text, images & info is 1546 x 423 pixels and should be located in the center of the image. See the example below:
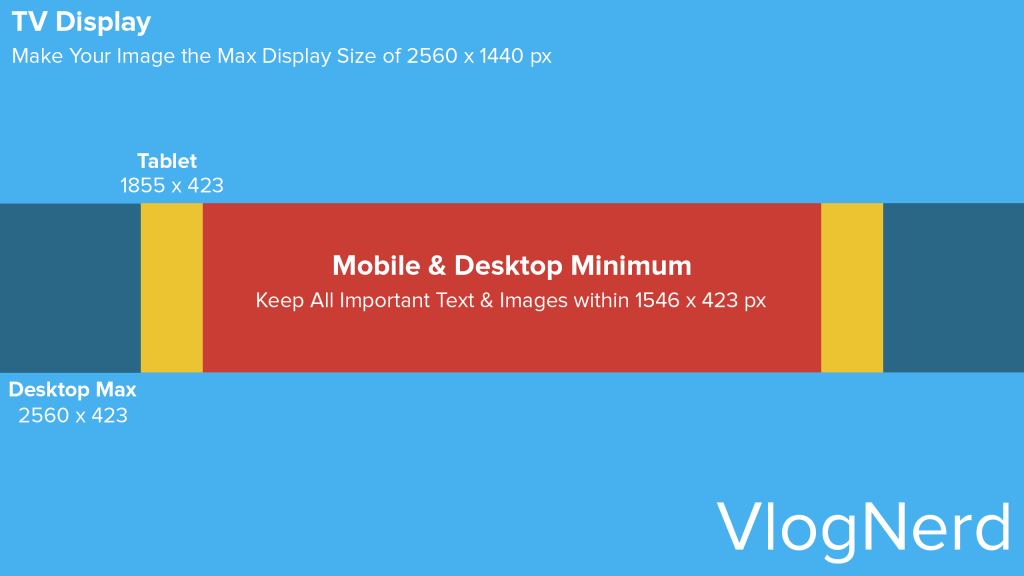
Click here to download the full size image template.
VlogNerd Tip:
While YouTube allows you to slightly adjust the overall crop if you upload a large image, it does not allow you to tweak the mobile or desktop crop points within the image. The mobile crop will always be at the center of the large image.
How to Upload a YouTube Banner
Uploading a banner to your YouTube channel is easy:
- Log in to your channel. To upload your YouTube banner or channel art, log into your YouTube channel account.
- Click the camera icon. Click the camera icon in the upper right corner of the banner. (If you've never added a banner, you'll first need to click the "Customize Channel" button, and then you'll get an "Add Channel Art" button.)
- Upload and preview the image. From there, select or drag and drop the banner image file. Once you've added it, YouTube will preview how the image will be cropped on various devices.
Adding a Banner to a New Channel:

Click "Customize Channel" then "Add Channel Art" if this is your first time adding a banner.
Adding a New Banner to an Existing Channel:

Click the Camera icon on your existing banner to upload a new photo.
Adding Links & Social Media Profiles to Your YouTube Banner
You may notice that some channels include links to websites and social media profiles within their YouTube banners. You can select up to 5 links to be displayed in the bottom right corner of your channel banner.

Example of Banner with Links from The Film Theorists
How to Add Links to Your YouTube Banner:
- Click Customize Channel. Once you've logged into your Channel, hit the "Customize Channel" button below the banner.
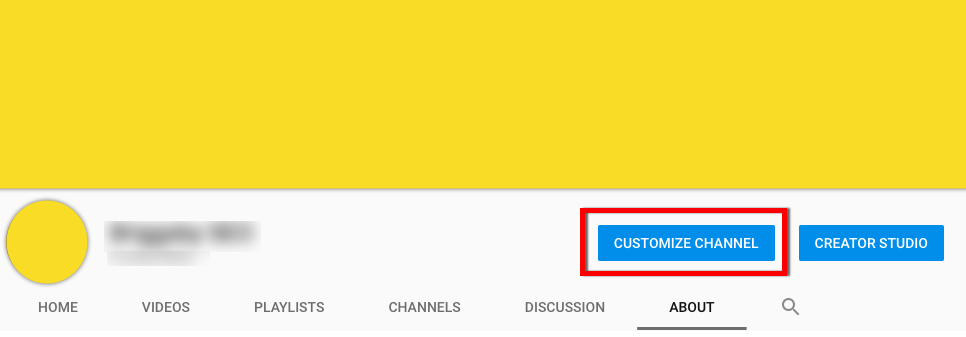
- Head to the "About" Section. Click on "About" on the right side.

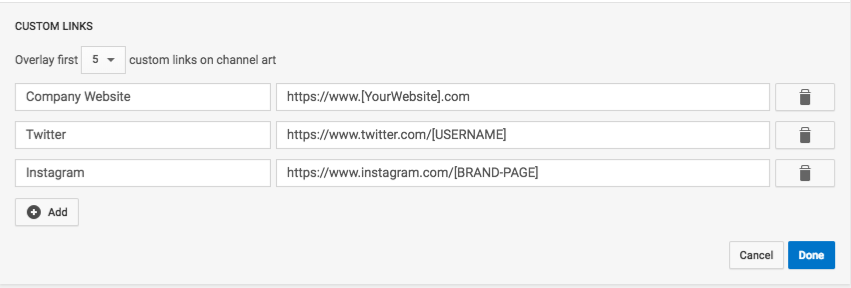
- Add up to 5 Links. Add links to your website and social media profiles. YouTube will display an icon + text for the first link and icons for the remaining pages.
VlogNerd Tip:
Be descriptive with your link names. Don't just say "Instagram" but instead use as "@YourName". In the example above, The Film Theorists don't just list "Website" or "Store" but instead say "TheoryWear" so users know exactly where the link leads.
What to Include in Your YouTube Banner
Your YouTube banner should reflect your personality or brand and give viewers a sense of your personality and the types of videos you create.
Consider including:
- Photo of You: Using photos of yourself can help viewers feel more connected.
- Your Name: Don't forget to include your name and/or the name of your channel!
- Upload Schedule: Let viewers know how often you're creating content.
YouTube Banner Examples
Here are some great banner examples from top vloggers:

Philip DeFranco has a bright and engaging banner that manages to include his face, name, and upload schedule. His primary link highlights his most recent fundraising project. (Check it out here.)

Peter McKinnon is a cinematographer with a PNW aesthetic. His banner is simply a stylized photo of himself and his name. He links to a shop that sells the LUTS he created and is known for. (Check it out here.)

Tati Westbrook uses a collage of video stills to create her banner and lists her brand name in text below, proving you don't need fancy Photoshop skills to create an effective banner. (Check it out here.)

Gary Vaynerchuk uses the three primary elements of a successful banner: a photo, his name, and his upload schedule. (Check it out here.)

Amy Landino uses her channel banner to draw attention to her work as an author, calling it out in the banner image and linking to her book. (Check it out here.)
Best Tools for Designing a YouTube Banner
YouTube banners are easy to make. You can get started with the YouTube banner template from VlogNerd, or check out any of these tools:
1. Adobe Photoshop
Best Overall Tool
Cost: $10/month
Using Photoshop will give you the most control over your images and text, allowing you to create the perfect banner for your channel. The downside is that Photoshop costs money and can be challenging to learn. If you're using Photoshop, you can get started with this template from VlogNerd.
VlogNerd Tip:
We strongly recommend the Classroom in a Book series if you're getting started learning Photoshop.
2. Adobe Spark
Best for Beginners
Cost: Free
Adobe Spark is a free tool from Adobe that includes cool images and fonts that you can use to make your channel art. You can choose from preset layouts, images, image filters, fonts, and color palettes.
It's photo filters and controls aren't great if you're using photos of people (which we highly recommend doing), and it can be hard to keep your important text and images within the safe space. However, if you're just getting started and want a professional looking banner, give it a try!

Runner-up Free Tool: Canva also offers a free tool for creating YouTube banners, but its options are more limited than Adobe's and there's a much longer onboarding process once you sign up.
3. Microsoft PowerPoint
Best Software You Probably Already Have on Your Computer
Cost: $7/month
If you're used to using Microsoft PowerPoint for work or school, you can use it to create your YouTube banner.
- To get the right size: Go to File -> Page Setup, and select "Custom" from the dropdown menu. Then type "2560 px" as the width and "1440 px" as the height. (PowerPoint will convert this into inches.)
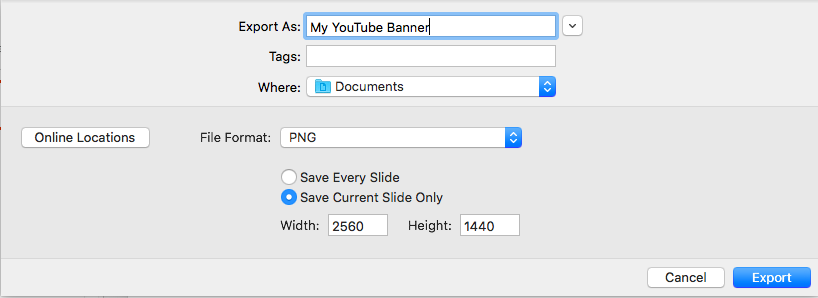
- To export as an image: Once you're all set, go to File -> Export and choose "PNG" as the file type. You'll see the dimensions as 2560 x 1440 px if everything is sized properly.
Time to Get Creating!
If you have any questions about creating a great YouTube banner, you can check out the official guide from Google or tweet to us @thevlognerd!

